Your Python Starter Pack (part 2) 🎒

Welcome back! 💁♂️
In the last post, we covered the most essential tools a minibuilder would need to start writing clean code in Python. Today, I will focus on workflow tools that will make our own work but also future collaboration with other developers easier.
And this will be applicable even to the solo developers, because guess what? Your first collaborator is your reviewer. They need to be able to analyze your code, which implies they also need to run it. In addition, making good tools means building code that is as easy as possible to maintain, which means we need to be mindful of future contributors, which may very well include our future selves!
We will start by talking about source control, something I am sure most of you have heard about, then cover the concepts of environment and dependency management, which is critical to Python development.
I hope you will find it interesting enough to read until the end, this is a long one!
A gentle intro to source control
Picture this:
You've been asked to take care of the implementation of a process to generate a new type of report for an important client. It was decided that this process should be automated, and that you should leverage on an already existing in-house reporting tool.
As you look into the functionalities of the tool, you see that some of its features could be generalized to also work for your new report, and you decide to refactor these features.
This work is going to be reviewed by your supervisor, to ensure that the new version of the tool works and is up to the standards set by your organization.
Once the work is finished and it is time for it to be reviewed, the following questions immediately come to mind:
- How will your supervisor know the extent of the changes you have performed?
- Even if you tried explaining it in an email, have you kept track yourself?
- Could they possibly gain insight into the process that went into producing the result (i.e. the updated codebase)?
Delivering a bunch of code files to your reviewer, letting them figure out what changed, goes against the "owner" mindset that we've previously discussed. To make both the development and the code review easier, we need to use source control.
Source control and "git"
Source control (also known as version control) is, simply put, the practice of managing changes made to code. In this post, I will not cover theory or stay vague, instead, I will focus on the most widely used Version Control System ("VCS") out there: git.
If you do not have already, start by downloading git from the official website, or any other source you trust. Once installed, you will need to provide a little bit of configuration. In a terminal, run the following commands.
$ git config --global user.name "Your name"
$ git config --global user.email "Your email address"When first working with git, you create a so-called repository in your code directory. The existence of this repository means that your codebase is now under version control, and the tracking will be performed from within the repository. To create a repository, run the $ git init command. The repository is materialized in the form of a hidden folder named .git in the root of your directory.
Now that you have your repository, any new file you create within your directory will be tracked by git. If you already had files in the directory before the creation of the repository, you need to tell git to track them, by running the $ git add . command.
After making changes to your code, you need to commit those changes to git. "Making a commit" is basically telling git that the codebase evolved, from a working state to another working state, and saving a snapshot of that new codebase, with a message attached explaining the change. The commands to run to make a commit are the following.
$ git add .
$ git commit -m "Your commit message"
Why do I have to run $ git add . again? Simply put, git expects you to stage changes for commit, before committing them. If you commit often, you won't have to worry about staging too much, but it provides flexibility in splitting your changes into two or more commits, if you so desire.
(In practice, we may want to enforce standards and rules on how commits should be documented, e.g. via commitizen. However, this is not essential unless you start working with large teams, and I will therefore put it aside for now.)
The whole history of commits made into a repository is saved, thus providing a full audit trail of the changes made into the code. If the application you're working on ends up broken after a commit, you can literally go back in time, and jump to an earlier commit, to start from the last point at which the code worked.

The person in charge of reviewing can then simply look at the differences between the last reviewed commit, and the latest commit you've made, using the $ git diff [old commit] [new commit] command.
Remote repositories
So far, we've only talked about how you can use git locally. Indeed, your git repository is tied to the file system you are using, and is therefore somewhat linked with your own machine. If multiple people end up working on the same project, we need to find a way to share its repository.
To do so, we use a version of the repository hosted on a server, called a remote repository. The fact that it is "remote" (i.e. not on our machine) means that contributors can only edit its contents indirectly, and it can therefore represent a single source of truth for our codebase.
This repository can be either hosted on-premises or managed by a third-party organization. The most commonly used services which provide web-based remote repositories are GitHub, GitLab, BitBucket and Azure. For personal projects, I would recommend GitHub, as it allows you to host private repositories (i.e. not visible by other users) as part of its free tier. Moreover, it is already hosting most of the packages and libraries you use, and you may therefore already be comfortable with its interface. For work you plan to do as part of your job, get acquainted with the solution already implemented, and adhere to the guidelines set out by your company.
After setting up a remote repository using your service of choice, you should clone it into a directory, using the $ git clone [remote repository url], which will do the following:
- Initialize a local git repository
- Pull the code from the remote repository
- Set the local git repository to track the remote repository
Branching
But where version control systems like git really shine, is in enabling you to adopt a branching workflow. So far, we've only talked about working in a repository to implement a single feature that will be reviewed after we've done. This is a purely sequential workflow. What would happen if we were to team up with another minibuilder, with her implementing feature A, while we implement feature B?
In a sequential workflow, this would not really work, as we would be modifying the same sets of files, causing conflicts along the way, especially when refactoring is needed. Branching allows both of us to start from the latest version of the code that has been deemed correct (e.g. by management), and work on our individual features separately.
There are many branching workflows (e.g. Gitflow), and I don't want to go too deep in the weeds in this post, but the gist of it is:
- Your repository will have a default branch, usually named
master. This branch is not special, but is usually used as the central branch of the repository. - When you want to implement a feature, you should branch out of
master, into a new branch, usually calledfeature/[your feature]. To do so, start by creating the branch on your remote repository, for example using the provided web interface. Then, you need to update your local repository so that it can see the new branch, using the$ git fetchcommand. Finally, switch to the new branch locally, by using$ git checkout [branch_name]. If you do not use a remote repository, you can create the branch and activate it by running the$ git checkout -b [branch_name]command. - Every commit you make to this branch will only exist within the branch. When you are done working on the feature, you will "push" the commits to the remote repository, by running
$ git push. While the command can take additional arguments, by default it will push the commits of the active branch into the remote branch it is set to track. For full detail on the command, refer to the original documentation. - When reviewing the implementation, the reviewer will thus only need to compare the latest commit in your branch vs. the one of the
masterbranch. To do so, she will run the$ git diff master [branch_name]command. - Once the code is reviewed and tested, it is time to merge your branch into master. The commits you have made in your branch will now be added to the
masterbranch. - When your teammate finishes her work, she should first merge master into her branch, since master has been updated from your merge. This may cause merge conflicts, as your refactors may be incompatible with hers. Before being able to merge that branch back into main, those conflicts will have to be resolved.
- After all of this is done, you should have an updated master branch with both features implemented, and no conflict!
For a deeper dive on the concept of branching within git, check out the official documentation.
Command line vs Graphical User Interface ("GUI")
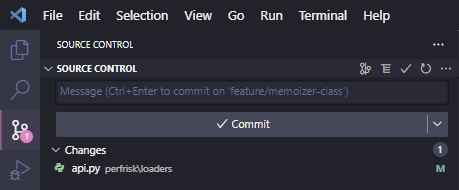
So far, you have read about the most common git commands, which you can use to elevate your programming workflow. As you may expect, some tools provide an easier way to run the source control workflow. For example, your favorite code editor may integrate a handy file tracker and buttons, see VSCode below.
While I believe that minibuilders should use the tools at their disposal, I would encourage anyone who is not very familiar with the git workflow to use the command line instead of those GUIs. The simple reason: intention. Since it is possible to make big mistakes using git (which could result in code being lost), you need to be aware of what you are doing at all times, especially when you're learning. Using the commands means that each action is carried out with intention, and you will gain a better understanding of the workflow as a whole.
You can find a short recap of the commands below:
| Action | Command |
|---|---|
| Initialize a repository | git init |
| Clone a remote repository | git clone [url] |
| Add files that predate the repository to tracking | git add . |
| Stage file or directory for commit | git add [file/directory] |
| Commit staged files | git commit -m "Your commit message" |
| Check the status of the working directory and staging area | git status |
| Create a branch (from the current active branch) | git branch [branch_name] |
| Activate a branch | git checkout [branch_name] |
| Create a branch and activate it | git checkout -b [branch_name] |
| Merge branch into active branch | git merge [branch_name] |
| Compare commit_2 to commit_1 | git [commit_1] [commit_2] |
| Compare branch_2 to branch_1 | git [branch_1] [branch_2] |
| Update local repository from remote repository | git fetch |
| Push commits to remote repository | git push |
| Pull commits from local repository | git pull |
Environment and dependency management
How many of you have heard those dreaded words:
"I don't get it, it works on my machine!"
One could spend a great deal of time troubleshooting this issue, but the reason why this would occur is simple:
The person running our code is running it in an environment that is non-compliant with the requirements we set when we wrote it.
The first thing we need to make sure of when this happens is whether we defined the requirements explicitly, rather than fully implicitly. Most pieces of code will have external dependencies, and these dependencies need to be explicitly documented if we ever hope for anyone to contribute or use our code.
Now assume that we did our job and documented our library's dependencies, saying that it needs Python 3.10 and the latest version of pandas to work. Our users/collaborators, will start by installing the correct Python version, and then run pip install pandas before trying to run our code.
Little did we know, this version of pandas itself has dependencies. For instance, it requires a version of numpy higher than 1.21 to work. But what if our users/collaborators also use another package, which is incompatible with these versions of numpy? Our dependency requirements may break their own code!
The solution to this very common issue lies in the use of virtual environments. Using virtual environments allows you to isolate your projects from each other, thus not having to worry about potentially conflicting dependencies. Each environment has a specific Python interpreter, installed on your machine (e.g. Python 3.10), and libraries (e.g. installed via pip).
There are a lot of tools that provide virtual environments and dependency management, some even part of the Python standard library (e.g. venv). However, we would like to have a very clean method which allows us to:
- Have our library/tool be installable, i.e. that our users don't have to pull the source code to use it.
- Have the library dependencies installed when the library is installed.
- Have it be easy for the library to be installed in a virtual environment.
To do that, I would recommend checking out poetry.
Installing poetry
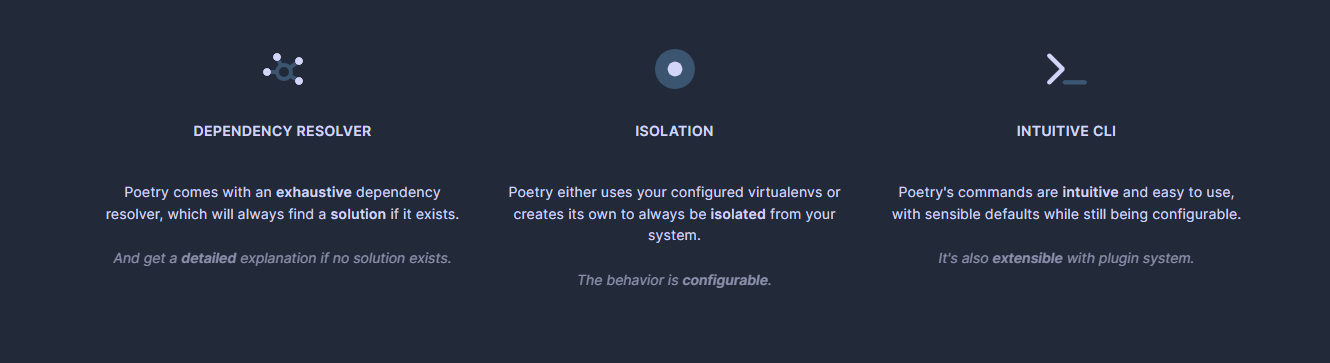
Poetry is an intuitive tool that allows you to resolve dependencies in your projects, in an isolated manner, and which makes packaging a breeze.
poetryTo get started with poetry, start by installing pipx using pip, by running the following commands:
$ python -m pip install --user pipx
$ pipx ensurepath
pipx will allow you to run poetry in its own isolated environment (how meta). Please refer to the official documentation if you need more information.
Then, install poetry by simply running $ pipx install poetry.
Setting up poetry
To illustrate how to work with poetry, let me start from zero, not even from an empty directory. From the root directory, I run $ poetry new my_library, which will create a blank project for me, stored in the directory with the name I supplied to the command.
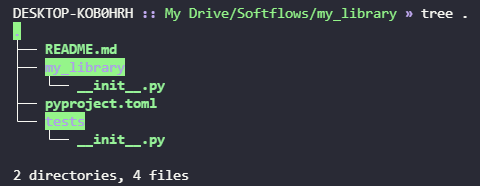
poetry creates when using the new commandpoetry has now created two folders and four files:
- A
my_libraryfolder, which is a Python package that will contain the library code (hence the__init__.pyfile); - A
testsfolder, which is a Python package that will contain all of our unit tests; - An empty
README.mdfile; and - A
pyproject.tomlfile.
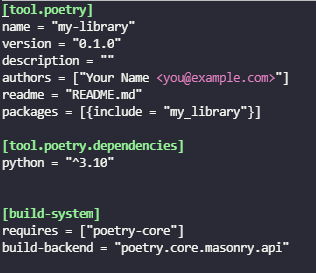
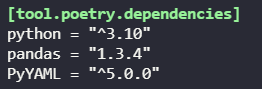
Out of all of these elements, the pyproject.toml file is surely the most important. Indeed, it is the best-practice way to supply project and build settings for Python applications, and is expected to replace the more common setup.py (if you've never heard of it, don't worry). In our case, it contains boilerplate information, some of which needs to be updated manually (e.g. the name of the authors), but also the library's dependencies.
pyproject.toml fileTo add a new dependency, we use the following command:
$ poetry add [package_name]To add conditions on the package version, you can define lower/upper bounds as well as exact versions in the command. For example, if I specifically want the version 1.3.4 of the pandas package, and version at least 5.0 for PyYAML, I run:
$ poetry add pandas@1.3.4
$ poetry add PyYAML@^5.0.0
Now, the [tool.poetry.dependencies] section from our pyproject.toml file was updated to include our new dependencies. On top of that, a poetry.lock was created. This file includes all of the actual dependencies, direct and indirect (e.g. the implicit numpy dependency coming from pandas), and is basically the inventory of the packages included in the virtual environment created by poetry.
Finally, you can define "development dependencies", which are only required to be had by contributors to the project, and not the library's users. For example, if we want to install the tools mentioned in Part 1, we would run the following:
$ poetry add black flake8 pre-commit --dev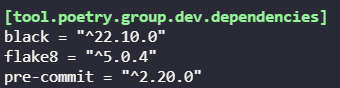
How does this relate to virtual environments?
At this point, we have not interacted with any virtual environment. Indeed, the poetry commands largely took care of that for us. But what if we try to run flake8, a development dependency we've installed via poetry, the usual way?

flake8 is not present in our global Python environment, the command doesn't workThe solution is to first activate the virtual environment by prefixing our command by poetry run. The new command simply activates the virtual environment tied to the directory before running the original command.
$ poetry run python3 -m flake8 .Since flake8 was installed as a development dependency, it is included in our environment, and can run within it.
If you do not want to bother doing that for every single command, you can simply spawn a shell, via the $ poetry shell command.
How would a developer be onboarded?
Onboarding a new developer is really easy with this setup. First and foremost, you need to ensure that your pyproject.toml and poetry.lock files are included in the repository (i.e. that they are tracked and have been committed).
When another developer clones the remote repository to her local machine, she can simply run $ poetry install, which will build a virtual environment that complies with the dependency requirements set out in the poetry.lock file. If this file is missing, poetry will resolve the dependencies based on the list included in the pyproject.toml file, and re-build the lock file.
Conclusion
I hope you are now more familiar with the concepts of source control, virtual environments and dependency management. While this is only scratching the surface, these are core tools in the minibuilder's arsenal, because they allow us to reduce friction to a minimum when working with code, and they require very little infrastructure/setup.
If you don't already use these tools, make an effort to integrate them into your workflow, and I guarantee it will lead to code that is much less of a pain to maintain, review, and use in the long term.
If you have any topic you would like to suggest for a future post, please comment below, shoot me an email, or send me a direct message on LinkedIn!
See you next week 🐍!


Comments ()